How to Check If an Electric Fence Is Working
To know if your electric fence is working, check more than just the ticking sound. A healthy fence should have strong voltage around the full fence line, a regular flashing fence light, working gate contacts, correct earthing, a healthy energizer battery, and an alarm that triggers when there is a real fault.
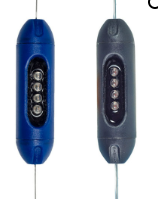
The simplest visual clue is an electric fence light. If the light flashes strongly and regularly, voltage is reaching that point. If the light flashes slowly, flashes only every few pulses, or stops flashing, the fence may have a voltage drop, vegetation touching the wires, damaged insulators, bad joints, gate wiring problems, or another fault.
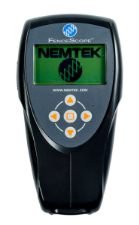
A proper electric fence tester or diagnostic tool, such as the Nemtek Fence Scope Multi Tool, can go further by helping diagnose fence faults, voltage, current, energy, pulse waveforms and electrical noise. Nemtek describes the Fence Scope as a 4-in-1 tool used to diagnose fence problems and help keep an electric fence operating at ideal levels.
A Fence Can Be On, But Still Not Protecting You Properly
Many people see the wires on the wall and hear the energizer ticking, then they assume the electric fence is fine. That is a dangerous assumption.
The tick only tells you that the energizer is pulsing. It does not prove that the power is reaching the whole fence. It does not prove that the gate section is working. It does not prove that the alarm will trigger if someone cuts or shorts the fence.
If it is not tested, it is not protection.
That is the simplest way to look at electric fencing. A fence that looks good from the ground can still be weak, leaking voltage, bypassed, badly earthed, or not alarming properly.
What a Fence Light Tells You
A proper electric fence light is one of the easiest visual checks. It works from the high-voltage pulse of the fence. When the pulse is strong enough, it charges the light and the light flashes.
In plain English: if the fence has good voltage at that point, the light normally flashes in a healthy rhythm. If the fence is weak, the light may need two, three or even four pulses before it flashes. That slower flash is a warning sign.
| Fence light behaviour | What it may mean |
|---|---|
| Strong regular flash | The fence is likely pulsing well at that point. |
| Flash becomes slower | Possible voltage drop, leakage, bad joint, vegetation, or a fault starting somewhere. |
| Flashes every 2 pulses | The fence may be weaker than it should be and needs checking. |
| Flashes every 3–4 pulses | There is likely a bigger fault or serious voltage loss. |
| No flash | The fence may be off, disconnected, badly faulted, or not receiving voltage at that point. |
What Usually Causes a Weak Fence?
- Leaves, branches or creepers touching the live wires
- Wet vegetation pulling voltage down
- Broken or cracked bobbins and insulators
- Loose joints or rusted connections
- Bad gate wiring or faulty gate contacts
- Damaged HT cable
- Poor earthing
- A weak battery or energizer problem
- Lightning damage or old repairs done badly
One Fence Light Tells You the Fence Is Alive. More Lights Can Show You Where It Dies.
On a small fence, one light can help. On a bigger fence, more than one light can help even more. Older fence lights were often limited because too many could load the fence. Many newer low-load fence lights are designed better, and depending on the type of light, energizer, fence length and installation design, more than two can often be used on a zone without causing a noticeable voltage drop.
The important part is placement. If you put one light near the start, one after a section, and one near the return side, you can see whether the voltage is reaching different parts of the fence. If the first light is healthy but the next one is dead or slow, the fault is probably between those two points.
If the last light near the return side flashes strongly, that is a good sign that the pulse is travelling far around the fence. It still does not replace proper testing, but it gives a very useful early warning.
Important
Fence lights are monitoring clues. They are not the whole test. A proper electric fence check still needs voltage testing, earth testing, alarm testing, gate contact testing, battery checks and fault finding.
How the Loop, Return Line and Diagnostic Testing Work
A wall-top electric fence is often wired as a looped system. A simplified version is this: the live pulse leaves the energizer, travels around the property on one live line, loops up to another live line, travels back, loops again, and continues until it reaches the final return side of the fence.
In real installations, the layout is not always clean. Extra sections, gates, wall extensions and old repairs can loop out from the main run, complete a section, and return back into the original run. This is where fault finding becomes more interesting.
A strategically placed light after one of these looped sections tells you whether voltage is reaching that point. If the light before the section is flashing strongly but the light after the section is weak or dead, the fault is likely inside that looped section, the joints feeding it, or the return back into the main line.
Where the Nemtek Fence Scope Fits In
Visual lights help you see symptoms. A diagnostic tool helps you test properly. The Nemtek Fence Scope Multi Tool is described by Nemtek as a 4-in-1 diagnostic tool for electric fences. It has modes for fault direction/voltage/current, energy measurement, pulse waveform display and electrical noise measurement.
Fence Probe Mode
Used to quickly indicate the direction of a fence fault while showing voltage and current. This is useful when you need to narrow down where the problem is instead of guessing around the whole property.
Fence Energy Mode
Used to measure output energy along the fence. In practical terms, this helps check whether the fence still has enough energy at different points to do its job properly.
Fence Scope Mode
Used to display the electric fence pulse waveform. Distorted waveforms can indicate faults, bad connections or other problems on the fence line.
Fence Noise Mode
Used to show electromagnetic interference from the fence or energizer. This can help find cracked insulators, sparks, shorts and noisy fault points.
Technical Bottom Line
Fence lights are good for ongoing visual monitoring. A proper tester or Fence Scope style tool is better for diagnosis. Together, they make fault finding faster: the lights tell you where to start looking, and the tester confirms what is really happening.
Do Not Use Your Body as a Tester
Some experienced installers know old field tricks with a long piece of grass or a dry stick, but this is not proper advice for homeowners. The wrong plant, wet material, short distance, bad footing or contact with metal can shock you.
Simple rule
Do not touch or test an electric fence with your body. Use a proper electric fence tester or ask a technician to test it.
Electric Fence Working Questions
Does a ticking energizer mean my electric fence is working?
No. It means the energizer is pulsing. It does not prove the full fence line has good voltage or that the alarm will trigger correctly.
Does a flashing fence light mean the fence is healthy?
It is a good visual clue, but not a full test. The voltage, earthing, gates, alarm response, battery and fence line still need proper checking.
Why does my fence light flash slowly?
A slow flashing fence light can mean voltage is dropping. Causes can include vegetation, bad joints, cracked insulators, damaged cable, poor earth, gate faults or energizer problems.
What is the best way to test an electric fence?
Use a proper electric fence tester or diagnostic tool and test the fence at multiple points, including gates, far sections and the return side. Also test the alarm response.